Wednesday, March 28, 2012
Cheddary Garlicky Chicken
Yum - something about this chicken is still lingering with me. The first day I ate it, I thought "this isn't bad" - I knew the hubby wouldn't eat it without lots of Sriracha sauce, so I primarily made it for me and the girls. My 4-year-old wouldn't eat it (shocker!) but the toddler would, so I'm going to put this in the win category. And surprisingly the leftovers tasted even better! Super easy recipe, with good flavor to the chicken. Although I realize my food "photography" leaves MUCH to be desired!
Adapted from www.allrecipes.com
Garlic Cheddar Chicken
1/4 cup butter
3 cloves garlic, minced
1/2 cup dry bread crumbs (I used a combo of Italian seasoned and panko - will look for seasoned panko next time!)
Salt and pepper to taste
1/4 cup freshly grated Parmesan cheese
3/4 cups shredded Cheddar cheese
About 1.2 lbs of chicken tenderloins
Directions
Preheat oven to 350 degrees F (175 degrees C).
Melt the butter in a saucepan over low heat, and cook the garlic until tender, about 5 minutes.
In a shallow bowl, mix the bread crumbs, Parmesan cheese, Cheddar cheese, salt, and pepper.
Dip each chicken tenderloin in the garlic butter to coat, then press into the bread crumb mixture. Arrange the coated chicken breasts in a 9x13 inch baking dish. Drizzle with any remaining butter and top with any remaining bread crumb mixture.
Bake 30 minutes in the preheated oven, or until chicken is no longer pink and juices run clear.
Monday, March 19, 2012
Supereasy, non-toxic paint at home!
Today was Day 1 of Spring Break for Lani, and I had to salvage the day after a morning trip to the doctor's, for what seems like a sinus issue but the doc insists is a cold . . .we'll see. I had promised Lani a fun-filled Spring Break consisting of trips to the beach, zoo, picnics, etc., and today was shot thanks to the doc visit and then Naya's afternoon nap - so, paint project! Saved by Pinterest, again.
Homemade Doodle Paint
From:http://www.delawarecountymoms.com/2011/07/getting-crafty-with-nicole-homemade.html
Supplies:
Squeeze bottles for the paint: I used 12 oz. bottles that I found from Wal-Mart for $99/each - the original blogger says you can get bottles in the chocolate making section of any craft store, and she herself found them at Jo Ann Fabrics
- Flour
- Salt (I had to use Sea Salt for one of the bottles, apparently it didn't make a different)
- Water
- Coloring: You can use tempera paint (wet or dry), food coloring or natural coloring agents such as beet juice, raspberry or blueberry juice reduction, etc. I used neon food coloring (note: I only use food coloring for art projects - I wouldn't add artificial dyes to food for my babies to ingest!)
- Glass/Plastic bowls
- Spoons/Whisks
- Funnel: optional...but it helps with getting the paints into the squeeze bottles
Here are the simple instructions:
Follow these instruction for each paint color you'd like to create!
In a bowl, mix equal parts: Flour, Water & Salt. Following the original blogger, I used 1/2 cup of each. I could easily double it based on the size of my bottles, but wasn't sure I'd have enough salt. Mix this really well with a spoon or whisk...no clumps. You can add more or less water depending on the consistency of paint you'd like, but it seemed that an equal (or just barely less) amount of water worked the best. Once that mixture is blended well, add a tiny bit of coloring. The more coloring you add, the more vibrant your paints will be. Once the paint is blended with the coloring, use your funnel to pour each paint color into its own squeeze bottle.
The original blogger notes that this paint works best if you use a thicker paper (or even posterboard) to doodle on - because of it's water base, it might soak the paper. I used cardstock, but am going out for posterboard later today! Also, the original blog entry has some cute printables to cut out and paste onto the bottles - I don't think our paint will last long enough for it to be worthwhile for me to do all that this time around! But if we continue making it, definitely. Cute and fun project!
I also love her suggestion of giving these as a gift: If you use all dry ingredients (flour, salt, powder tempura paints), you can put the ingredients minus the water into the squeeze bottles and package 'em up really pretty. Just include simple instructions to 'just add water'!
Thursday, March 15, 2012
Crockpot Buffalo Chicken
So. Good. This is my second time making it - you can add a packet of ranch dressing mix in, if that's the flavor you like with buffalo chicken, but we omit it.
Ingredients:
1.3 lbs chicken tenderloins
1 bottle of buffalo sauce - I used a 12 oz. Buffalo Wild Wings Medium Sauce bottle
Directions:
Cut up tenderloins (can be frozen) in bite size chunks, into slow cooker. Add entire bottle of sauce. Cook on low for 7-8 hours. Thirty minutes before the end time, add in 2 Tablespoons butter.
I shredded the chicken, mixed in about 2 Tablespoons of mozzarella cheese, and heaped it onto onion buns. DELICIOUS!!! And ridiculously easy, which is even better!
Monday, March 5, 2012
Fire-crackers
Good stuff! My husband got these at a USAF bake sale while we were stationed in Texas, in a Ziploc bag that had the recipe printed on the outside. That was years ago, and I just got around to making them - just the right amount of zing, and it has even my toddler stuffing handfuls of cracker into her mouth!
Texas Firecrackers
Ingredients
1 1/4 cup canola oil
2 Tablespoons Crushed Red Pepper
1 Tablespoon Garlic Powder
1 Package Dry Ranch Dressing Mix
1 box Club crackers
Directions:
Mix oil, spices, and ranch mix in a bowl. Put the crackers in a large plastic bag, then pour oil mixture over crackers. Turn bag several times to coat evenly. Store airtight.
**Note: I generally avoid all dressing mixes, since they more often than not contain MSG (or one of its nicknames intended to mislead the public - usually autolyzed yeast extract, hydrolyzed protein, etc.) In this recipe I did use a packet, and it killed me a little bit inside when I bought it a month ago. Since then, I've found a ranch dressing mix recipe on Pinterest, which I have now prepared and waiting in the pantry for my next batch of firecrackers - I'm hoping the taste is the same! Will post those recipes soon.
Friday, March 2, 2012
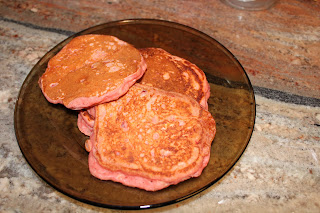
Pink Princess Pancakes - a/k/a Pancakes colored with Beet Powder
I will never understand the widespread use of artificial colorings in our food supply - and not just in candy, but in medicine, condiments, etc., etc. And the "natural" alternative to red coloring is carmine, which is apparently ground up insects!! In an effort to avoid them, I bought red beet powder from Amazon.com, and when my daughter requested Red Velvet Pancakes (i.e. pancakes colored like Red Velvet - she doesn't actually seem to enjoy the taste of Red Velvet!) this morning, I whipped up a pancake batter using a basic recipe from Allrecipes, and then threw in some beet powder:
Pink Princess Pancakes (basic recipe adapted from the Fluffy Pancakes Recipe on www.allrecipes.com)
Ingredients
3/4 cup milk
2 tablespoons white vinegar
1 cup all-purpose flour
2 tablespoons white sugar
1 teaspoon baking powder
1/2 teaspoon baking soda
1/2 teaspoon salt
1 tablespoon red beet powder
1 teaspoon vanilla
1 egg
2 tablespoons butter, melted
cooking spray
Directions
Combine milk with vinegar in a medium bowl and set aside for 5 minutes to "sour".
Combine flour, sugar, baking powder, baking soda,and salt in a large mixing bowl. Whisk egg, vanilla, and butter into "soured" milk. Pour the flour mixture into the wet ingredients, add in beet powder, and whisk until lumps are gone. It'll make a beautifully pink batter!
Heat a large skillet over medium heat, and coat with cooking spray. Pour 1/4 cupfuls of batter onto the skillet, and cook until bubbles appear on the surface. Flip with a spatula, and cook until browned on the other side. Serve and enjoy!
Thursday, March 1, 2012
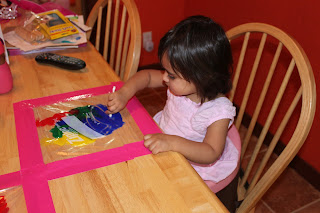
Loving Pinterest - Painting in a Ziploc Bag Art Project
I am beyond addicted to Pinterest, and am primarily a food-and-crafts pinning junkie! One pin gave me the idea of putting fingerpaints in a large ziploc bag, duct-taping it to the table, and letting the girls at it, with a couple of q-tips as their paintbrushes. I think the original pin suggested a mixture of cornstarch, water, and food colorings to make the paints. Since I've been looking to use up the remainder of our Crayola fingerpaints so I can do some of the homemade paint recipes on Pinterest, I used that instead - the girls had a blast! I left up my toddler's bag on the table, and she used it as a tablemat for a couple of days - she loved that :)
Subscribe to:
Posts (Atom)